Wednesday, May 25, 2011

Play-cation photos: Extended Edition

AWI 28mm Perry/Foundry mix

 Queens Rangers flank some Continentals.

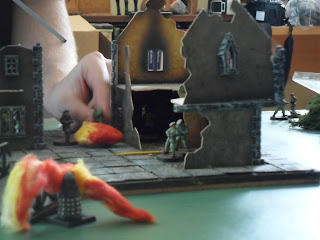
Dr. Who is shot down by a Dalek as he attempts to reverse the polarity on the Dalek Pulse Generator Station.  Jelly babies fly everywhere.

AWI

AWI.  Riflemen snipe from the woods.

An African merc game setup.

The locals venture out to find the mercs.

The Colonel, hostage in hand, attempts to negotiate his way out.

Major Tom is having none of it.  He has not been authorized to negotiate on behalf of his client.

Narrowly surviving an Uzi burst, he tosses a grenade into the house to break the final resistance.

A Mahdi held town awaits the British in an 1880ish Sudan game.

Straight ahead, boys!

The Fuzzies come out to meet the English head on.

An African merc game.  28mm Assault group figs.


Another successful mission for Major Tom.  The alternate candidate is rescued from his cell.

Thursday, May 19, 2011

Battles from the May play-cation

Imperial stormtroopers come over the hill at some rebel scum.  28mm Perry's.  Rules were modified Disposable Heroes/This Very Ground.
Doctor Who and U.N.I.T. soldiers attempt to destroy the Dalek pulse generator station.  Rules and figures from Black Tree Design's Dr. Who series.

British troops, flanked by Queens Rangers, advance on American postions.

"Undomesticated Water Fowl".  Mercenaries attack an African warlord's compound.


An African warlord's fort and town before a Merc assault.
Sudan 1880s game.  Figures Ral Partha 25mm from the 1980s.

another view of the Sudan game.  Egyptian troops assault a Mahdist walled town.

Mercs (Dr. Who U.N.I.T. figures) free Dr. Okoya from the Evil Dictator's prison cells.

Monday, March 14, 2011

Mongrel 28mm Congo Mercs

Congo Mercs with Uzis
Comparison with The Assault Group Modern Africa figs.

Saturday, March 12, 2011

Cold Wars 2011

Just returned from the Cold Wars (that were actually a very pleasant mid 50's).  As usual this was a shopping trip for me though there were some interesting games being run but my pictures turned out too horrible to post.
The start of all good things.  None near home so its always a junk food treat.
The dealer hall. 
Loot pile.  The usual production requirements, Perry "stash" boxes and the Mongrel Congo miniatures which have been so hard to find.  Movement trays from GF9 were at a price too good to refuse.
A close up of the Mongel Congo mercs with Uzis.  Haven't seen any pictures of this set before so here's one for cyberspace.

All in all most happy with the Congo mercs.  They are being sold by a company called Badger Games and it appears they plan to release more figures in the future but their website is not up yet.
Congo Codes:
001 African Mercenary Personalities
002 African Mercenary Command 1
003 African Mercenary Command 2

004 Congo Merc Infantry with Rifle Advancing
005 Congo Merc Infantry with Rifle Advancing and Firing
006 Congo Merc Infantry with Rifle Skirmishing
007 Congo Merc Infantry with Uzis
008 Congo Merc Infantry with Thompson, BAR and Brens
009 Congo Merc Heavy MG Team Advancing
010 Congo Merc Heavy MG Team Prone Firing

The codes in red are not out yet.

Monday, March 7, 2011

WW2 Disposable Heroes game

This is a WW2 Disposable Heroes game played a while ago.  The US Paratroops are a mix of Battle Honors, West Wind, Black Tree and Artizan.  I like the Artizan best but I had the others long before they were born (even before the HBO series) so they all have to get along now.

The observant will note that I failed to take the plastic wrap off the building's floor.  Must have got that from my grandmother who kept her furniture the same way.
A Battle Honors .30 cal team being guided by an Artizan NCO.
Battle Honors command section and Black Tree bazooka team dug in behind the estate wall.
The German attackers.  I couldn't find my box of summer Germans that day so many of these figures have great coats and "mud bases" ( I could never fully commit to doing snow.)

Sunday, February 6, 2011

Sharp Practice FIW: Part 2

The second installment of our French and Indian War campaign went off smoothly last night.  The tactical rules used were "Sharp Practice" by Too Fat Lardies.  Campaign rules were homegrown.  Miniatures were 28mm Old Glory and RAFM.
In our first session there were some minor skirmishes (see older posts for details) but we were finally up to the main event.  The French and British regulars would square off around a small town and British fort. 

The British "fort".  Really a blockhouse and palisade with the village beyond.


The French chose to attack at night.  Their Indians on the left flank managed to come right up on waiting Brits in the darkness.

The British right flank consisted of a unit of regulars, a 6 pound gun and 6 militia in one of the houses.  Curiously the British players chose to deploy these forces ahead of their defensive works.

The French Marines brave the British grapeshot.

In an impotent display of  dice rolling, the cannon fails to stem the french advance and the crew falls back with the gun.

The militia in the house manages to make a nuisance out of themselves for a few turns.  The gun is repositioned in hope of redeeming itself.

On the right the British regulars fall back giving steady fire that keeps the Indians from closing to melee.  In the center however, the French regulars are able to overrun the cannon.

Top British big man Major Bethesda reveals himself (scandal!) with his grenadier bodyguards.  He is outside the fort, behind hastily constructed barricades made of supply crates and barrels and the locals' furniture.

Keeping one step ahead of the Indians, the British right flank falls back to the barricades.

The British left flank finally comes off blinds.  They have been watching the fields ahead of them for sign of the enemy but the noises they heard in the corn were loose pigs.

After several unprofitable exchanges of fire, the French Marines finally decide to fix bayonets and charge the house.

The fisticuffs results in surprisingly few casualties but the militia are ejected from the building.  They exit from the back as the marines pour in the front.

The French right flank makes a late appearance.  They roll their 6 pounder up in an effort to put fire on the barricade.

The thin red line is in place.  In a critical engagement of fisticuffs, the British right flank is able to fend off the Indian attack. 

To compound the Indian problems, an unsporting shrapshooter snipes the Indian Big Man, severely impairing their ability to recover from shock and get back in the fight.

The British concentrate their fire and manage to kill off the French gun crew, but they are still outnumbered by French infantry that is closing in across their front.

The French regulars and Canadian militia close in on the British left.

The French Big Man pauses to have his portrait done.  Then sounds the Charge!


3 French units attack the barricade.  On the right the Marines are beaten back.  On the left the Canadian militia are sent packing.  In the center the Marines breach the barricade and obliterate the American militia.  (in the excitement I forgot to take pictures and only have this after shot)

The high water mark of the French attack.

We had to stop the game here as it was getting late.  The French had taken the village but the British were still firmly entrenched behind their defensive works. 

All in all we are quite happy with the SP rules.  We had one new player who only had about a 15 minute brief but by the end of the game was following things quite well.  The rules seem to suit the black powder period where you can have a tremendous amount of fire (ie: big handful of dice) that can end up doing very little but the bayonet is often decisive (or at least compels movement).  The randomness of the card system leads to some tense moments as each side waits for their card to come up to implement their master plan and causes "friction" that feels right.